In Part 1 of this 4-part series, I gave you a peek behind the curtain of chaos that was my early years of homeschooling. In this post, I’m hoping and praying that the things the Lord has been teaching me (mainly by hard knocks) and which I have been privileged to teach to other mothers, will breathe life into your homeschool, reduce stress (for you and your kids), and bring order to your chaotic days.
(This post contains affiliate links. Please see my disclosure policy for full details.)
But why should I listen to any of this, you might say? What’s the benefit of spending parts of my precious summer or the occasional weeknight doing all these things?
The Benefits of Planning and Organizing:
But why should I listen to any of this, you might say? What’s the benefit of spending parts of my precious summer or the occasional weeknight doing all these things?
Let me humbly set some real benefits before you that come straight out of the life of our family.
So, what is the very first thing I suggest to moms who are either new to homeschooling or who are old hands but constantly feel like they are pushing a loaded cart uphill?
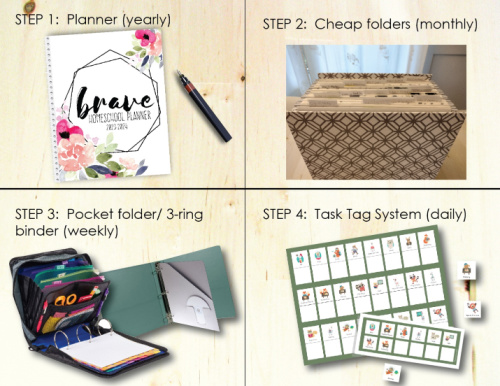
The overlapping 4-step method!
If you’ve never used a detailed method like this, you can easily feel daunted at just the thought of it. But once you start putting simple plans in place, you’ll be surprised at just how easy and time-saving it actually is.
Find a planner you can really use and plan a whole year at a time: (Approximate time it takes: 5-6 hrs. over the summer)
While any planner will do, often, the simpler the planner the better. I prefer the Brave Homeschool Planner, but there are many others on the market to choose from. Made by a homeschool mom, for homeschool moms, the Brave Homeschool Planner has just the right number of pages and none of the superfluous fluff. So go and pick yourself up a planner that you love (even if it’s just a plain notebook) and set yourself a goal to work at it a little every week throughout the summer months.
But why would you take the time before the start of the school year to do this? Well, the answer is simple: This one habit can be enormously life-giving all throughout the year.
When you have things running on autopilot:
You have more free time.
How could more planning give you free time? I know it seems counterintuitive, but in what follows I am going to give you a rough estimate of the time it takes to accomplish each of these scheduling/organizational hacks, and I hope you’ll be utterly surprised at how little time it truly takes, and what a monumental load (both in mental stress and time) it lifts off of your shoulders and your everyday schedule.
Everybody has more family time.
When you have more time to breathe with less stress, a spark naturally returns to everyone in the home. Because you are no longer juggling 17.5 balls because most of your school has been put on autopilot, you have more time to do the things you love with your family.You and your children are less stressed.
When things are on autopilot—when you're not being pulled in multiple directions every single moment and when your children know what they need to do, how to get it done, and feel confident doing it—homeschooling instantly feels (and is) so much more manageable for everyone involved.
You have more flexibility.
Let’s be honest. No matter how organized you are, some days will just feel like a ride on the Crazy Train. Sometimes, you’re going to have to call off homeschooling for the day because of illness, a sudden but necessary road trip, or any myriad of things that could derail your plans for that day. With nothing on autopilot, these curve balls can leave chaos in their wake. But with a few simple hacks, dropped balls are so much easier to pick up, shuffle around, and put in their proper places again. (I can attest to this firsthand. My children and I have had a whole lot of curve balls thrown at us these last three years.)And the list goes on and on!
So, what is the very first thing I suggest to moms who are either new to homeschooling or who are old hands but constantly feel like they are pushing a loaded cart uphill?
The overlapping 4-step method!
The Overlapping 4-Step Method:
If you’ve never used a detailed method like this, you can easily feel daunted at just the thought of it. But once you start putting simple plans in place, you’ll be surprised at just how easy and time-saving it actually is.
Because of this 4-step system, I spend almost no time planning what my next week of homeschooling will look like or what the next day will entail. I don’t stay up late printing worksheets like I used to. I don’t have to perpetually apologize to my kids because I didn’t have the necessary supplies for the fun things I promised we’d do anymore. These four steps have saved my sanity and freed up my time to the Nth degree.
NOTE: Essentially, with this method, plans are made at the macro (yearly) level and then worked down to the micro (daily) level. The following information will provide a launching place. Tweak this method to suit your family’s style and flow--make it your own!!
NOTE: Essentially, with this method, plans are made at the macro (yearly) level and then worked down to the micro (daily) level. The following information will provide a launching place. Tweak this method to suit your family’s style and flow--make it your own!!
STEP 1 // PLANNER:
While any planner will do, often, the simpler the planner the better. I prefer the Brave Homeschool Planner, but there are many others on the market to choose from. Made by a homeschool mom, for homeschool moms, the Brave Homeschool Planner has just the right number of pages and none of the superfluous fluff. So go and pick yourself up a planner that you love (even if it’s just a plain notebook) and set yourself a goal to work at it a little every week throughout the summer months.
There are many ways to think about filling out a planner but most moms I’ve talked to prefer the following two methods:
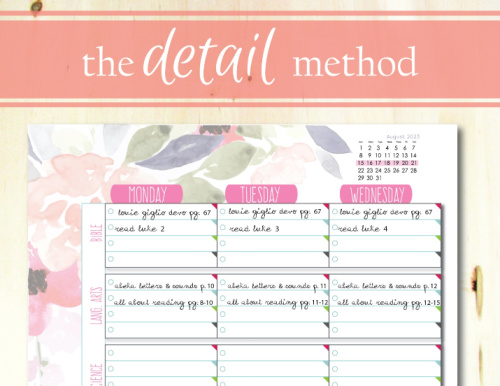
The Detail Method:
Write out every lesson and/or page number in detail for each of your child’s subjects throughout the year. When using the Detail Method, a page of your planner might look something like this.The Easy Method:
If you don’t like being bullied by page numbers and dates, especially when you know you tend to miss days and don't want to constantly be erasing and rewriting all your well-thought-out plans, use the easy method instead!Write out every subject to be studied for each of your children throughout the year but skip all the pages and lesson numbers. This is mainly for your reference and accountability not to supply all the necessary details (those details get taken care of in Steps 2 & 3 in a super easy way—hang in there!) When using the Easy Method, a page of your planner might look something like this:
Of course, this isn't the only Easy Method. Jamie has her own version. The point is, to make lesson planning a simple process so that the planner works for you, not against you.
But why would you take the time before the start of the school year to do this? Well, the answer is simple: This one habit can be enormously life-giving all throughout the year.
Since using a planner, I no longer worry that I’m not going to remember that random once-a-week reading comprehension worksheet my son needs to do because every week a reminder is there staring me in the face. Also, when a sick day happens, I can clearly see the rest of the week’s schedule and begin moving necessary subjects and projects to days later in the week, ensuring that no balls get dropped.
Using a planner this way keeps you accountable to the hours and regulations of your particular state without feeling bullied. You know and can clearly see that you’re meeting that 175-day goal and that all the necessary subjects are getting their moment in the spotlight. Gone are the days of playing catch-up after returning from taking your daughter to the doctor unexpectedly or bringing the extra set of keys to your husband at work because he's locked himself out of the car.
A planner can be such a gift but only if you commit to planning out your year in the downtime before school begins. On mild summer nights, you can almost always find me on my front porch with a glass of something sweet in my hand, listening to the last of the birdsong, and setting myself up for a great start to the school year by putting this huge chunk of my homeschool on autopilot!
In the next post, I’ll show you how to use some super cheap, easy organizational hacks that take minutes to do and will eliminate future grey hairs from your head. Hyperbole, you say? You just wait!
 Krista Smith is blessed to be the mother of three beautiful children and is privileged to homeschool them using an eclectic variety of methods. She has a deep and abiding love for tan-colored coffee, spending time with her family, and seeing children find their forever homes through adoption. But above all of these things, Krista is, first and foremost, a lover and follower of Jesus Christ. So, may the Lord and His Gospel get every ounce of honor, glory, and credit for anything she writes, says, or does.
In the next post, I’ll show you how to use some super cheap, easy organizational hacks that take minutes to do and will eliminate future grey hairs from your head. Hyperbole, you say? You just wait!
Organizing Your Homeschool Year Series
___________________________________________
 Krista Smith is blessed to be the mother of three beautiful children and is privileged to homeschool them using an eclectic variety of methods. She has a deep and abiding love for tan-colored coffee, spending time with her family, and seeing children find their forever homes through adoption. But above all of these things, Krista is, first and foremost, a lover and follower of Jesus Christ. So, may the Lord and His Gospel get every ounce of honor, glory, and credit for anything she writes, says, or does.


No comments:
Post a Comment