I don't know about you, but my Pinterest Boards are chuck full of Martha Stewart-style perfection! I have pinned soooooooo many great ideas in the last few years...or have I??
Every once in a while, I actually get the notion...and time {ahem!}...to try one of the fabulous-looking recipes, homeschool studies, crafts, and DIY projects that I've cataloged on my boards. Now, I haven't necessarily been keepin' tabs, but I'm guessing that many of my outcomes haven't always been as picture perfect (or as edible) as the originals.
In fact, I can recall one breakfast cookie recipe disaster that went something like this...
I pulled the steaming cookies from the oven, called the Hubs over to sample the first bite, and watched as he immediately ran to the trash can to spit it out. Then, with complete sincerity he asked, "Is this some kind of practical joke? Is that really our breakfast?"
Maybe it's just me? Maybe I'm the only Mother Inferior on Pinterest who can't seem to follow the directions correctly.
But, I'd like to assume that if I've had more than my share of Pinterest disappointments, I'm not the only one.
I've teamed up with some of the lovely ladies of iHomeschool Network to bring you a once-a-month link-up of some of our Pinterest FLIPS and FLOPS. If you're a blogger, we invite you to try one of the projects that has been collecting dust on your Pinterest boards. Blog about your success or failure...whichever the case may be. And, link up to get the word out to other mommas about whether a project was a "two thumbs WAY UP" hit or was a "doesn't work in real life" disaster.
If you're NOT a blogger, I encourage you to check out the "been there, done that" posts on the link-up page and then start pinning...or deleting (whichever the case may be) these FLIPS and FLOPS!
Quite by accident, my FLIPS and FLOPS for the month have a pop bottle theme...which is funny because I don't drink pop...
FLIP: Self Watering Pots
The Hubs has always been the Master Gardener of the family. But this year, due to a more harried schedule, he officially past the torch to me. {gulp} As I have mentioned before, I am a BIG CITY southern girl held captive by love in a SMALL COUNTRY northern town. Believe me when I say, I know NOTHING about gardening apart from what I've read in a few books. I've been known to kill plastic house plants!
This spring, as I was faced with the responsibility of keeping green things ALIVE, I began a frantic search on Pinterest for Gardening For Dummies type pins. Not Kidding! Those were the actual words I typed in the search box. One of my very first inspiring FINDS was this one...Self Watering Seed Starter Pots. Pinned it. Tried it. Loved it!
You will need:
an empty 2 Liter bottle
scissors
a hammer
a large nail
yarn
water
potting soil
seeds or starter plants
Directions:
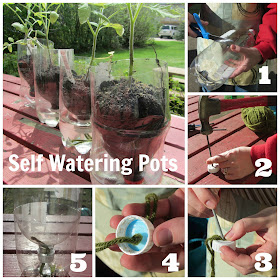
- Using scissors, cut the bottle in half. Remove the cap and set the bottle aside.
- Use the nail and hammer to pound a thick hole in the middle of the cap.
- Cut a length of yarn about 1 foot long. Double it over and feed 4-5 inches of the fold through the top of the cap.
- Tie a knot to secure the loop from going back through the hole. (The loop portion should be on the inside of the cap while the two strings are hanging loosely on the outside of the cap. The 2 loose strings will act as roots drawing up the water into the soil.)
- Screw the cap back onto the bottle. Pour about 1-2 cups of water into the bottom half of the bottle. Turn the top half upside down and place inside of the bottom half.
- Fill the top portion with potting soil and plant your seeds or starter plants. (You might want to pour a little water over the seeds/plants so that they maintain proper moisture until the yarn "roots" have time to suck water up into the soil.)
The Results:
I planted half of my starter tomato plants in these self-watering pots and left the other half in their original commercial containers. I left all the pots out in my mud room and only refilled the self-watering pots with water once. Unfortunately, I wasn't always very good about remembering to water the plants in the commercial containers (hence the NEED for self-watering pots). When the ground was warm enough to plant, I transplanted all of the tomatoes and was amazed at the difference between the two groups! My self-watered tomatoes were tall and lively while my ME-watered ones were droopy with browning leaves. Needless to say, I'll be doing ALL self-watering pots next season!
FLOP: Mosquito Trap
In my attempt to go as chemical free as I can, I was intrigued by this DIY mosquito trap. Mosquitoes just happen to be the unofficial state bird around here. And since our yard is hedged in on three sides by bushes and pine trees, it is a 5-star resort for all the mosquitoes on the block. (No joke! Neighbor's yard...no mosquitoes. Our yard...hundreds of them!)
You will need:
empty 2 liter
scissors
1-2 cups lukewarm water
1 tsp. yeast
1/2 c. sugar
Directions:
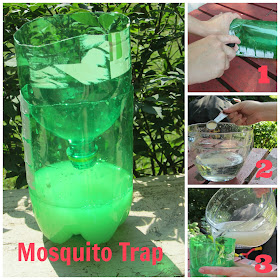
- Remove the cap and discard. Using scissors, cut the 2 liter in half. Turn the top half upside down and place inside the bottom half.
- In a bowl, mix the water, yeast, and sugar.
- Pour the mixture into the inverted bottle and set outside.
Results:
The yeast/sugar combination is suppose to emit a gas similar to the carbon dioxide that is exhaled by people and will attract mosquitos into the bottle. Because of the narrow neck of the 2 liter, the mosquitoes (supposedly) will be unable to find their way out, will become trapped, and will eventually die. The pinner claimed to have killed 1000s of bugs this way. But how many did I kill? ZERO. After a full 24 hours, I had a yard full of mosquitoes and an empty mosquito trap!
It is quite possible that I added too much water or that my yeast was getting old, but since I used the same yeast to make bread dough a few days later, I'm doubtful.
Now's Your Chance
This month only, the link-up will be hosted by iHomeschool Network. But beginning Monday, August 12th and continuing on the second Monday of each month, you can link up at any of the following homeschooling blogs.
or HERE at The Unlikely Homeschool


What a great idea! I think we must have made the same breakfast cookies because we had a similar reaction! I love the self-watering idea- I will have to do that next year since my garden doesn't like it when I go on a two week vacation ;)
ReplyDeleteYep! I think there should be a warning label on that breakfast cookie pin!
DeleteThose self-watering planters are genius! Not only for those of us who can forget to water {ahem} but also if you're going away for a couple days.
ReplyDeleteBummer about the mosquito trap. I try for no chemicals, too, but our mosquitoes in Maine laugh at anything but DEET.
Yep, I was totally disappointed. But, I'm not giving up hope. There's gotta be some kind of homemade brew that will kill those pesky things!
DeleteI'm glad to know about the mosquito catcher. I've seen that pin and pondered making it, but I had a feeling it wouldn't really do much to dampen the spirits of our vampires.
ReplyDeleteI tried the liquid (duggar family recipe) laundry soap....It works amazing in our he washer....going to be saving a lot of money.. and it was pretty easy to make.
ReplyDeleteOh, I wish I had such good luck with it. I used it for about a year and ended up throwing away so many whites that just turned a dingy yellow that I ended up going back to the store bought stuff. I hope you continue to have good success!
DeleteI caught a ton of stuff in our homemade bug catcher. I made them with diluted soda pop and water. The other thing is that your bottle opening must be much closer to the liquid, so they can't escape. Good luck next year. We have some nasty mosquitoes as well here in Alaska.
ReplyDeleteHmmm...good to know. It was so cheap and easy that it's certainly worth giving it another try. Thanks for the heads up!
DeleteNice!
ReplyDeleteI am literally laughing out loud because just last night I made these "breakfast cookies" that I believe you are talking about. I was so excited to taste these healthy cookies. I had to spit it out in the trash immediately. Horrible!
ReplyDeleteUgh! I feel your pain! But, at least now we are getting the word out about them.
DeleteThanks for sharing this information. I really like your blog post very much. You have really shared a informative and interesting blog post with people.. Buy google voice number
ReplyDeleteIndoor-waste-baskets and recycling bins are now available in abundance in order to meet all waste management needs in your home and office. bathroom waste bin
ReplyDeleteNice post! It is good to see you verbalize from the heart and clarity on this important subject can be easily observed...can you visit here... . Buy Gmail Accounts.
ReplyDelete