(This post contains affiliate links. Please see my disclosure policy for full details.)
Some of the resources we have used in the first few weeks of our study include the following:
They Lived Like This in Ancient Crete

Digging Into Yesterday
 , chapter 4
 I Wonder Why Greeks Built Temples: and Other Questions about Ancient Greece

Growing Up In Ancient Greece

Throughout our initial reading, it was evident that most of what is known about Grecian "everyday life" came from the excavation of ancient Grecian urns. These urns, made from terra cotta clay were made almost exclusively from master craftsmen in Athens. They depicted everyday life as well as religious beliefs. Since urns were such a major element of Grecian society, I thought it would be worthwhile to recreate some together using this fun seventh grade art class project as inspiration. I knew this was going to be a multi-step art project that would have to be completed over the course of several days. But, I was anxious to give my children the opportunity to work on a more complicated project that would challenge their ability and stretch their commitment to "get the job done."
Before we began, we learned a few of the secrets of ancient Grecian artists from Drawing History: Ancient Greece
 . We read that Greek painters liked to use wave border patterns in their work and rarely ever painted a person's full face. Side profiles were preferred.
To Make a Paper Mache Grecian Urn
You will need:
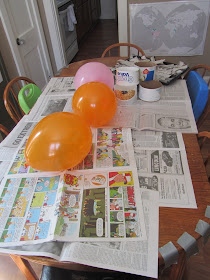
- one large balloon (not pictured)
- an empty oatmeal cylinder
- duct tape
- newspaper cut vertically into one inch strips
- paper mache paste (recipe below)
- heave cardboard (We used a diaper box.)
- an exacto knife or heave scissors
- a ruler
- paint
- paintbrushes
- extra newspaper for covering your work surface
Before my children began this project, I prepped our work space by blowing up all the balloons, cutting 8 strips of duct tape per person, cutting the oatmeal containers into three large "rings", and ladling paste into small containers so that everyone had their own paste bucket.
As this project was done in several phases due to drying time, I will list the directions accordingly.
Phase 1
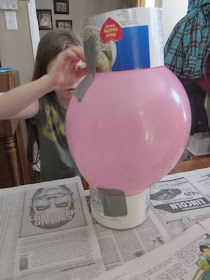
Now, place the top section...or a middle section...of the oatmeal container on the top of the balloon and tape in place. This is the initial skeleton of the urn.
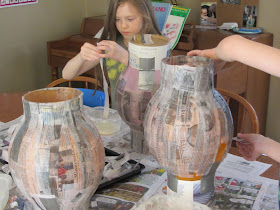
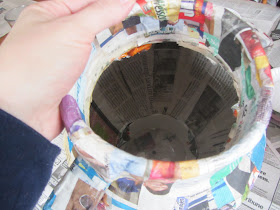
Beginning at the very top of the urn, press the strip onto the sides of the skeleton. Repeat this until the entire urn has been covered with 2-3 layers of paper mache. Be sure to stagger the strips so that you get an even surface.
Don't forget to cover the inside ridge by pressing strips up and over the top so that they nearly touch the top of the balloon. Although it is not necessary, I'd also recommend pressing strips on the bottom of the urn. It will make for a durable frame.
Before finishing this phase, I'd suggest you wet your hands with paste and use them to smooth out any wrinkles. Use firm and fast strokes so that you don't tear the wet layers. The tighter and smoother the paper mache, the stronger and prettier the urn.
Set the urns in a well-ventalated area or outside to dry for at least 24 hours. If you have extra paste, put it in a sealed container to save for the next phase of the process. (If the paste gets a bit clumpy after a few days, slowly add water until it gets to the desired consistency.)
Phase 2
Repeat the above steps once again adding 2-3 more layers of paper mache. Try to keep all the strips vertical. They are easier to attach that way and look much nicer than horizontal ones.
Phase 3
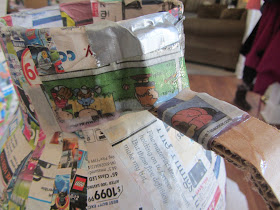
Using an exacto knife, cut two, one inch strips of heavy cardboard. (This should be done by an adult or an older teen.) Our strips were about 8 inches in length, but yours will need to be adjusted to fit the size urn skeleton you have created.
If you are creating an urn with TWO handles, repeat this entire process. Be sure to line up the handles so that they attach at a similar height on each side. (Otherwise, your urn will look lopsided.)
Using small strips of paper mache, secure the top and bottom of the handles to the rest of the paper mache. (I'd suggest doing a few horizontal pieces and then a few vertical ones.)
Now, wrap strips of paper mache around the handle. Overlap them as needed. Again, fill your hand with paste and smooth out the finished handles. Dry completely.
Phase 4
Using a needle or a pin, pop the balloon and remove the pieces.
Your urn should be hollow and quite sturdy.
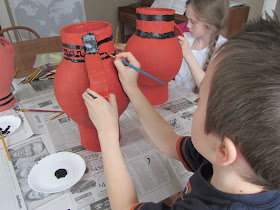
Using acrylic paint in terra cotta shades, paint the urn. (Although we did NOT paint the entire inside, we did paint the inside top ridge.)
Depending upon the paint, you may need to paint several coats. Let dry completely.
Phase 5
Using black paint, add Grecian-themed designs to the urn. Remember, less is best. Although REAL urns were quite elaborate, depicting many scenes of everyday life, we found it easier to keep to simple designs.
To Make Paper Mache Paste
You will need:
- 1 c. all purpose flour
- 8 cups water
- 6 tbsp. sugar
(As I did not have a pot large enough to double or triple this recipe, I divided one recipe's worth into three containers and had to repeat the paste recipe in phase two. There was enough left over paste to save in a covered container for phase three)










What a wonderful project. My kids would of loved this when we study the Greeks.
ReplyDeleteI"m trying to conceive of actually being able to follow through and finishing this project....... It's amazing, but the follow through......
ReplyDeleteI just had to dive right in...otherwise, it did seem a bit overwhelming. Breaking it down into phases REALLY helped. We only worked a little bit on it each day and then it was VERY do-able.
DeleteThis is so cool! I had no idea that they were made from paper mache until I started to read the directions! You can't tell from the pictures! So awesome!
ReplyDeleteThanks! I was really surprised with how well they turned out. It was so fun to see how dedicated my kids were to it. Sometimes I don't give them enough credit and just assume that they won't be able to do something. But, they almost always rise to the challenge when encouraged.
DeleteWow, these are awesome. Thank you for sharing this idea!
ReplyDeleteYour'e welcome.
DeleteHuhhh!!! Oh my goodness!! Somehow I totally missed that y'all have done mfw Adventures.. YES!! Yay!! Thank you so much for being here, and for taking the time to share.. ^_^ <3
ReplyDelete